How to Check Quality of a Kitchen Marble Slab: A Homeowner’s Guide
- Ar. Kartik Jain
- 15 hours ago
- 6 min read
📅 Published: June 15, 2026 | 🔄 Last Update: June 15, 2026 | ⏱️ Read Time: 6 min read
Table of Contents
TL;DR:
Buying a kitchen marble slab without checking its quality can be one of the most expensive mistakes during home renovation. This guide explains 4 important steps every Indian homeowner should follow.
Step 1: Visual Inspection: Check the slab for resin patches, unnatural veins, repaired edges, and visible cracks.
Step 2: Sound Test: Tap the slab with a coin. A clear sound shows good strength, while a dull sound may indicate damage.
Step 3: Porosity Test: Put a few drops of water and lemon juice on the surface to check absorption and stain resistance.
Step 4: Thickness & Finish Check: Choose a 20mm slab and inspect both the polished top and the back side.
The key takeaway is to select a dense, pre-polished, 20mm slab and hire an experienced karigar for a long-lasting installation.
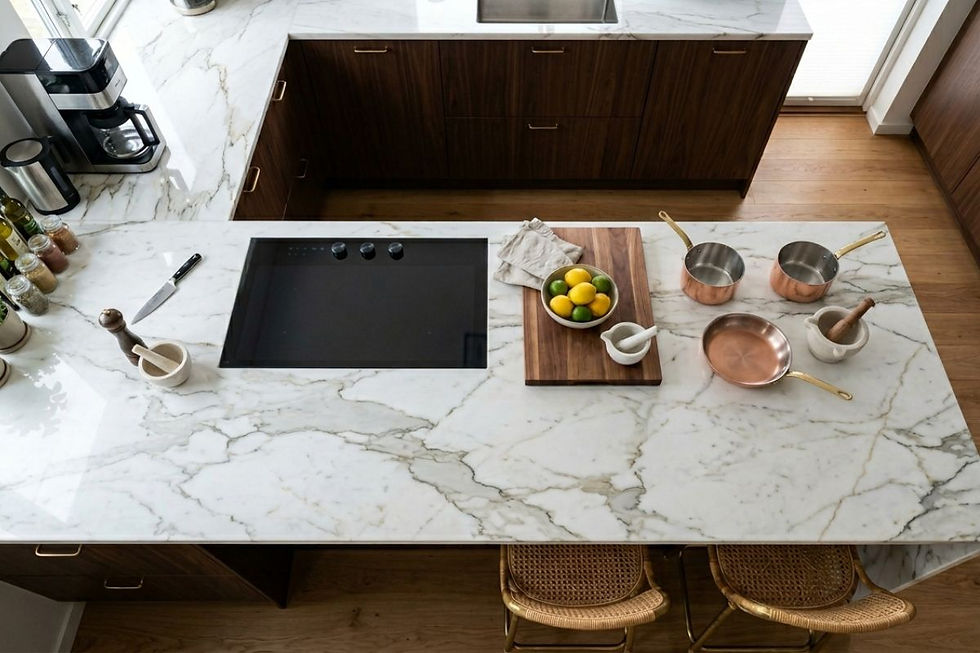
A kitchen marble slab is not just another material choice in an Indian home. It will be part of your everyday routine. From early morning chai to late-night cooking, this surface carries constant use, heat, spills, masalas, and moisture. That is why choosing the right kitchen marble slab is not only about beauty. It is about durability, hygiene, and long-term value.
In most Indian homes, the kitchen is where design meets real life. A polished slab may look premium in the showroom but perform badly once installed in an Indian kitchen countertop setup. You might notice stains near the masala section, dull patches near the sink, or weak corners around cut-outs.
These issues usually begin when quality checks are skipped. During kitchen renovation India projects, this is one of the costliest mistakes homeowners make.
Why Quality Checks Matter Before Buying a Kitchen Marble Slab
Many buyers trust appearance too quickly. That is understandable. When you are building a dream kitchen, emotions often guide decisions. You want a space that feels refined, timeless, and worthy of the investment. Still, marble is a natural stone. No two pieces behave in exactly the same way.
One kitchen marble slab may perform beautifully for years while another from the same lot may show problems early.
As we often see in Indian households, cooking patterns are intense and regular. Oil splashes, haldi marks, lemon juice, tomato gravies, and hot cookware all test the surface every day.
If the kitchen marble slab has hidden fillers, poor density, or uneven slab thickness, those issues will reveal themselves quickly. This is why simple checks at the buying stage can save major repair costs later.
Step 1: Visual Inspection of the Kitchen Marble Slab

Start by looking at the full slab from a short distance. Do not stand too close in the beginning. A proper visual scan helps you spot uneven colour patches, over-polished resin zones, and suspiciously repaired areas.
Some sellers use fillers and artificial tones to improve the look of a weaker kitchen marble slab. Under bright showroom lights, this can be hard to catch.
Move closer and inspect the veins and surface movement. Natural variation is normal in marble. The concern is whether the variation looks genuine or manipulated. Check the edges as well. Sometimes a kitchen marble slab appears perfect from the top but reveals patching or weak treatment at the side profile.
This step is especially important if you are buying from busy local marble mandis where quick decisions are common.
Fissure vs Crack in a Kitchen Marble Slab
This is where many homeowners get confused.
A fissure is often a natural line formed within stone. It does not always mean the slab is weak. A crack is different.
A crack usually interrupts the structure and can spread under pressure.
Understanding fissure vs crack is critical before approving any kitchen marble slab for cutting and installation.
Run your finger gently along the line. If it feels sharply open or visibly broken at the edge, stop and ask questions. Look at the underside too. If the same line continues through the body, it may be a structural issue. A damaged kitchen marble slab may survive transport but fail after installation near the sink or hob area.
Step 2: The Sound Test for a Kitchen Marble Slab

The sound test is simple and very effective.
Tap the kitchen marble slab lightly with a coin or metal key at different points. Test the centre, edges, and veined sections. A healthy slab usually produces a crisp and steady sound.
A dull or flat sound can indicate internal weakness, hollow spots, or hidden repairs.
You might notice one section responding differently from the rest. That difference matters. During kitchen renovation in India, this test often reveals faults that surface polish hides completely. Compare multiple slabs if possible. When a kitchen marble slab sounds solid across most areas, it usually gives better confidence for daily kitchen use.
Step 3: Marble Porosity Test for a Kitchen Marble Slab

Every natural marble has some level of absorption. The important question is how much and how fast. A basic marble porosity test can help you understand this.
Put a few drops of water on the slab and leave them for ten to fifteen minutes. If the area darkens quickly, the stone may be highly absorbent. That means more sealing and more care.
This matters a lot in Indian kitchens. Stain-resistance for masalas is not a small concern. It is a daily concern. Haldi, red chilli, oil, tea, coffee, and curry bases can leave marks on a porous kitchen marble slab if protection is poor. Ask for a sample piece and test with lemon juice as well.
Since lemon is acidic, it can reveal how the slab reacts to etching.
Slab Thickness Check for a Kitchen Marble Slab:
Thickness affects durability more than many buyers realise. While 16mm to 18mm is a common starting range, opting for 20 mm thickness is a smarter choice for Indian kitchen countertops, especially around sink cut-outs, corner joints and heavy-use cooking zones where stress on the stone is highest. Use a measuring tape or calliper and check multiple spots. A quality kitchen marble slab should have consistent thickness across the full body.
If one side is noticeably thinner, the slab may be prone to stress cracks after installation. This becomes even more risky around sink cut-outs and corner joints. In a modular kitchen, precise support matters. A kitchen marble slab with uneven thickness may look fine at first but behave poorly once weight and moisture come into play.
Step 4: Measurement and Finish Check for the Kitchen Marble Slab

Do not check only the face. Inspect the underside and edges properly. A poorly processed back surface can tell you a lot about the actual finishing standard. If the back feels overly powdery, heavily patched, or carelessly ground, ask the vendor why.
Often the real quality of a kitchen marble slab becomes visible where sellers assume buyers will not look.
Also check whether the slab is level and properly cut. Uneven edges can create installation problems for the karigar later. Good material makes good installation easier. At Chapter of Design, we always advise clients to judge the slab as a complete material package, not just a polished top view.
Final Advice Before You Finalise a Kitchen Marble Slab
A beautiful kitchen starts with wise choices. The right kitchen marble slab should look elegant, feel dense, sound solid, and show controlled absorption. It should also suit the realities of Indian cooking. A slab that fails basic checks will only create stress later, no matter how attractive it looked in the yard.
Always choose 20mm thickness, as it is the internationally accepted standard for marble slabs. Also, opt for pre-polished marble slabs to ensure consistent quality and avoid post-installation issues such as damage, black spots, or discolored patches.
Hire the right karigar. That matters as much as the stone itself. A skilled mason understands support placement, joint handling, sealing, and cut-out safety for an Indian kitchen countertop. When the material is strong and the workmanship is right, your kitchen marble slab becomes a lasting part of your home instead of a future repair problem.
FAQ's
How Do I Identify a Crack in Marble?
A crack usually feels deeper, wider, and more broken than a natural fissure.
Does Marble Yellow Over Time?
Yes. Poor sealing, moisture, adhesive issues, and low-grade treatment can cause yellowing.
Is the Water Test Enough to Judge Marble Quality?
No. Always combine the marble porosity test with visual, sound, and thickness checks.
Can I Trust Only the Showroom Polish?
No. Heavy polish can hide fillers, repairs, and weak spots in a kitchen marble slab.


Comments